Go back
HaleHound, an interesting piece of hardware for a fraction of the cost of the Flipper
22 april 2026
Don't get wrong the Flipper is a really really nice piece of hardware, can easily evolve, add extension card and with really nice features. The value of the Flipper is really good, all the work for the firmware is really good to and at a certain "price".
Disclaimer : this is for EDUCATIONAL PURPOSES ONLY !! ONLY TEST YOUR
OWN HARDWARE !!! DOING OTHERWISE IS ILLEGAL !!!
WARNING : this is for EDUCATIONAL and ETHICAL SECURITY PURPOSES ONLY !!
WE ARE WORKING STRICTLY WITHIN A LAB ENVIRONMENT ON HARDWARE AND NETWORKS WE OWN AND HAVE PERMISSION TO TEST.
NEVER USE THESE TOOLS ON NETWORKS WITHOUT EXPLICIT AUTHORIZATION.
WE AREN'T HERE TO BYPASS SECURITY' BUT TO UNDERSTAND IT SO WE CAN BETTER PROTECT OURSELVES.
Hale Hound
"price" and it can be really easy to build and flash to get the "basic" functionnality, that
can be done in a few minutes. You can extend functionnality with a GPS or add a Wi-fi module
to get a larger range than the default wi-fi module, NFC/RFID, you can add a lipo battery with
a boost converter, external antenna, Sd-card.
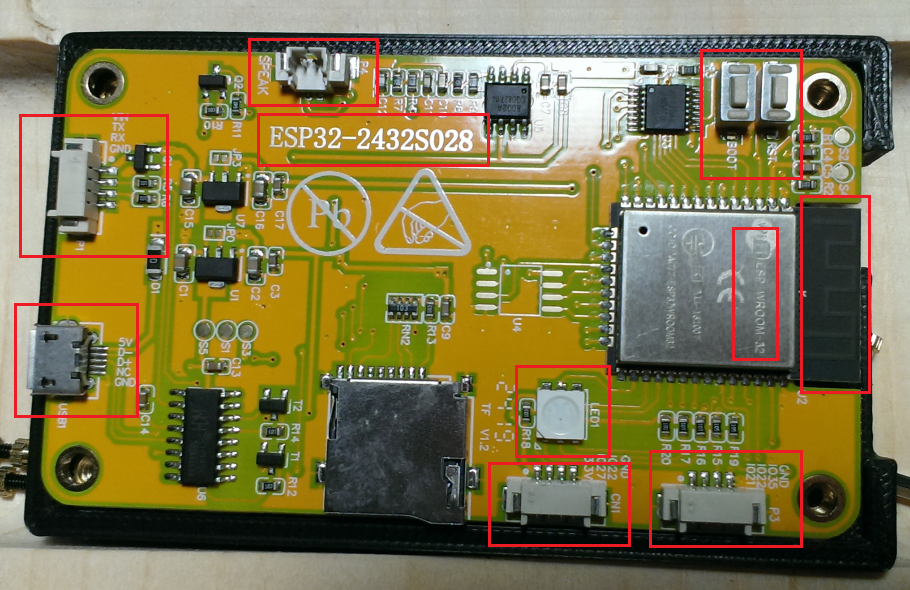
Board Specification
MCU : ESP32-WROOM-32, dual core Xtensa LX6 @ 240Mhz with WI-FI b/g/n + BT v4.2
Flash/RAM : 4 MBQSPI flash, 520 KB SRAM
Display : 2.8" TFT 240x320 (ILI9341), 65K colours, back-light on GPIO 21
Touch : Resistive, XPT2046 controller on VSPI busesAudio : PAM8002A 3 W class-D amp, GPIO 26
Storage: micro-SD (up to 32 GB) on VSPI
On-Board I/O : RGB LED (GPIO 4/16/17, active-LOW), LDR (GPIO 34))
User buttons : BOOT (GPIO 0), RESET (EN pin)
Free GPIOs : 35 (inputs only), 22, 27on JST headers
Power input : 5V via micro-USB, dual AMS1117 LDOc @ 3.3 V
Typical draw : ~ 115 mA with back-light full bright
Size / weight : 86 x 50 mm ~ 50g
Here some Modules Capabilitys to give you an rapid idea of what the HaleHound can do :
Hale hound capabilities WiFi
All WiFi attacks use the ESP32's built-in WiFi radio. No external module needed. - Puts the WiFi radio into promiscuous mode and displays real-time 802.11 frame statistics. Shows management, data, and control frame counts with a live packet-per-second graph.
- Floods the airspace with fake WiFi network names. Configurable SSID list or random generation. Uses raw 802.11 frame injection at max TX power.
- Scans for access points, lets you select a target by tapping it, then sends deauthentication frames to disconnect all clients from that AP.
- The WiFi Scanner module has a "tap-to-attack" feature. Tap any scanned AP and choose Deauth â the target BSSID, SSID, and channel are passed directly to the Deauther, skipping the scan phase.
- Captures probe request frames from nearby devices, revealing the SSIDs they're looking for. Select any probed SSID to instantly spawn a GARMR Evil Twin captive portal impersonating that network.
- Full AP scanner with signal strength bars, channel info, encryption type, and vendor OUI lookup.
Tap any result to attack:
Tap an AP:
DEAUTH Launch deauther pre-targeted at this AP
CLONE Launch GARMR captive portal with this SSID
- Standalone captive portal that creates a fake AP and captures credentials. Serves customizable portal pages from `portal_pages.h`. All DNS queries resolve to the ESP32, forcing a captive portal pop-up on connected clients.
- Scans for connected clients (stations) on nearby networks. Shows client MAC, associated AP, and RSSI. Supports deauth handoff to disconnect selected clients.
- Overwhelms a target AP's client table by flooding it with 802.11 authentication frames from random MAC addresses. Scan for nearby access points, tap to select a target, then flood. Force AP to exhaust its association table, causing legitimate clients to be unable to connect. Effective against consumer routers with small client table limits.
Hale hound capabilities Bluetooth
- Floods BLE advertisement channels (37, 38, 39) with garbage data to disrupt nearby BLE connections.
- Clones the identity of a nearby BLE device. Scan first, select a target, then the ESP32 broadcasts as that device.
- Broadcasts custom BLE beacon advertisements. Can impersonate AirTags, Tiles, or custom iBeacon/Eddystone payloads.
- Passive BLE traffic analyzer. Displays advertisement data, RSSI, device names, and manufacturer data in real time.
- Discovery tool that lists all nearby BLE devices with their names, MAC addresses, RSSI, and advertised services.
Hale hound capabilities others
WhisperPair CVE-2025-36911 Fast Pair Vulnerability Scanner
Scans for Google Fast Pair devices and probes for the WhisperPair vulnerability (CVE-2025-36911). Discovers Fast Pair service advertisements, then connects via GATT to check if the Key-Based Pairing characteristic is accessible outside of pairing mode a condition that allows unauthorized pairing.
AirTag Detect Apple FindMy Tracker Detection
Passive BLE scanner that detects AirTags, FindMy accessories, and compatible third-party trackers. Filters for Apple manufacturer data (0x4C) with FindMy type bytes (0x12/0x19). Displays MAC address, RSSI proximity bars, battery level estimate, distance calculation, and status byte for each detected tracker. Auto-rescans every 5 seconds with alert flash on new tracker detection. Tracks up to 20 unique devices simultaneously.
Scans for commercial BLE tracking devices across all major platforms. Identifies Google Find My Device Network (FMDN) trackers via service UUID `0xFEAA`, Samsung SmartTag via `0xFD5A`, Tile via `0xFEED`, Chipolo via `0xFE33`, and Apple AirTag via manufacturer ID `0x004C` with FindMy type bytes. Displays detected trackers in a scrollable list view with platform icon, name, RSSI proximity bars, and signal strength. Select any tracker for a detail view showing MAC address, platform, RSSI, battery level estimate, and status info. Auto-rescans every 5 seconds with alert flash on new tracker detection. Tracks up to 20 unique devices simultaneously.
Phantom Flood FindMy Advertisement Flood
Broadcasts fake FindMy OF (Owner-Finding) advertisements with random 28-byte public keys. Each advertisement appears as a unique tracker to Apple's locationd service on nearby iPhones, flooding the FindMy device list.
AirTag Replay Replay AirTag Identity
Captures real AirTag and FindMy BLE advertisements (MAC address + full 31-byte payload), then replays them. The ESP32 impersonates the real AirTag's identity, appearing as that tracker to nearby Apple devices.
You can find the complete list in the section "Feature Highlights" at : https://github.com/JesseCHale/HaleHound-CYD
Hale hound Board model
Hale hound Selecting the firmware
https://github.com/JesseCHale/ HaleHound-CYD/tree/main/flash_package
Hale hound Flashing the firmware
( git clone https://github.com/JesseCHale/HaleHound-CYD.git )
When you have localized the firmware it's time to write it to the board. We use esptool to do that. Under linux simply use your package manager to add the package like this for debain based linux distro : sudo apt install esptool
Connect the usb port to your pc and look for the new device with lsusb, in my case the baord appaer as :
user@pc3232:~$ lsusb
Bus 006 Device 001: ID 1d6b:0003 Linux Foundation 3.0 root hub
Bus 005 Device 005: ID 1a86:7523 QinHeng Electronics CH340 serial converter <========= HERE
Bus 005 Device 002: ID 17ef:6099 Lenovo Lenovo Traditional USB Keyboard
Bus 005 Device 001: ID 1d6b:0002 Linux Foundation 2.0 root hub
Bus 004 Device 001: ID 1d6b:0003 Linux Foundation 3.0 root hub
Bus 001 Device 003: ID 05e3:0610 Genesys Logic, Inc. Hub
Bus 001 Device 002: ID 051d:0002 American Power Conversion Uninterruptible Power Supply
Bus 001 Device 001: ID 1d6b:0002 Linux Foundation 2.0 root hub
user@pc3232:~$
user@pc3232:~/Data/Data/Doc/Doc_ESP32_2332S028/HaleHound/HaleHound-CYD/flash_package$ esptool -p /dev/ttyUSB0 -- chip esp32 --baud 115200 write_flash 0x0 HaleHound-CYD-FULL.bin
esptool.py v2.8
Serial port /dev/ttyUSB0
Connecting....
Chip is ESP32D0WDQ5 (revision 3)
Features: WiFi, BT, Dual Core, 240MHz, VRef calibration in efuse, Coding Scheme None
Crystal is 40MHz
MAC: xx:xx:xx:xx:xx:xx
Enabling default SPI flash mode...
Configuring flash size...
Auto-detected Flash size: 4MB
Erasing flash...
Took 7.38s to erase flash block
Wrote 2496512 bytes at 0x00000000 in 249.2 seconds (80.1 kbit/s)...
Hash of data verified.
Leaving...
Hard resetting via RTS pin...
user@pc3232:~/Data/Data/Doc/Doc_ESP32_2332S028/HaleHound/HaleHound-CYD/flash_package$
Now check the baord and follow onscreen instruction, first calibrate the screen, when calibration is saved, check if is look correct when you touch other part of the screen than hit the boot button in the other side of the board.
And voila you ready to use the HaleHound on your board.
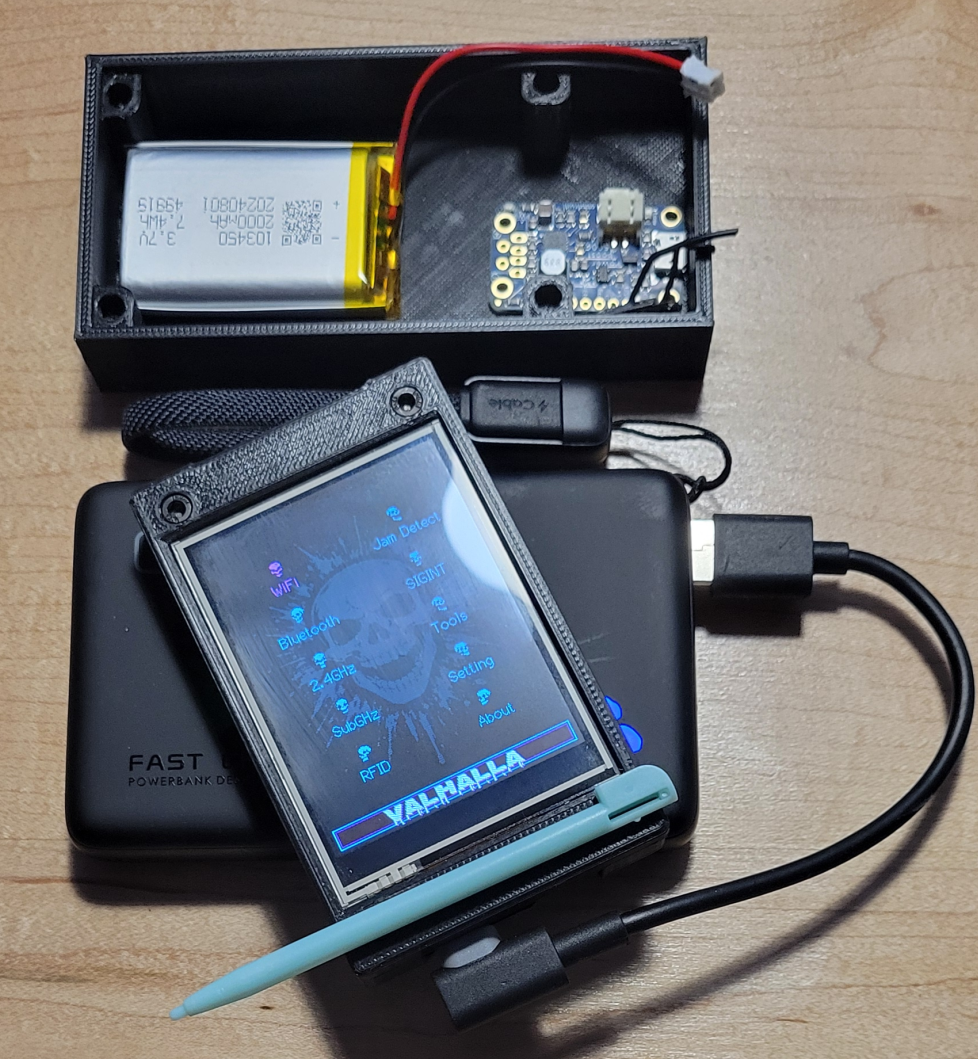
Hale hound Powering the board
At this time I'm using an external battery and a USB cable to power the borad but it's not really practical. I have
a 3.7V Lipo and a powerboost on my desk that do nothing... I started to build a new enclosure for the battery and the
powerboost and a power switch. I have a 3d printer and I use Freecad to build the new enclosure. Some photos, this is
a work in progress.
There is a power switch, the powerboost and a battery.
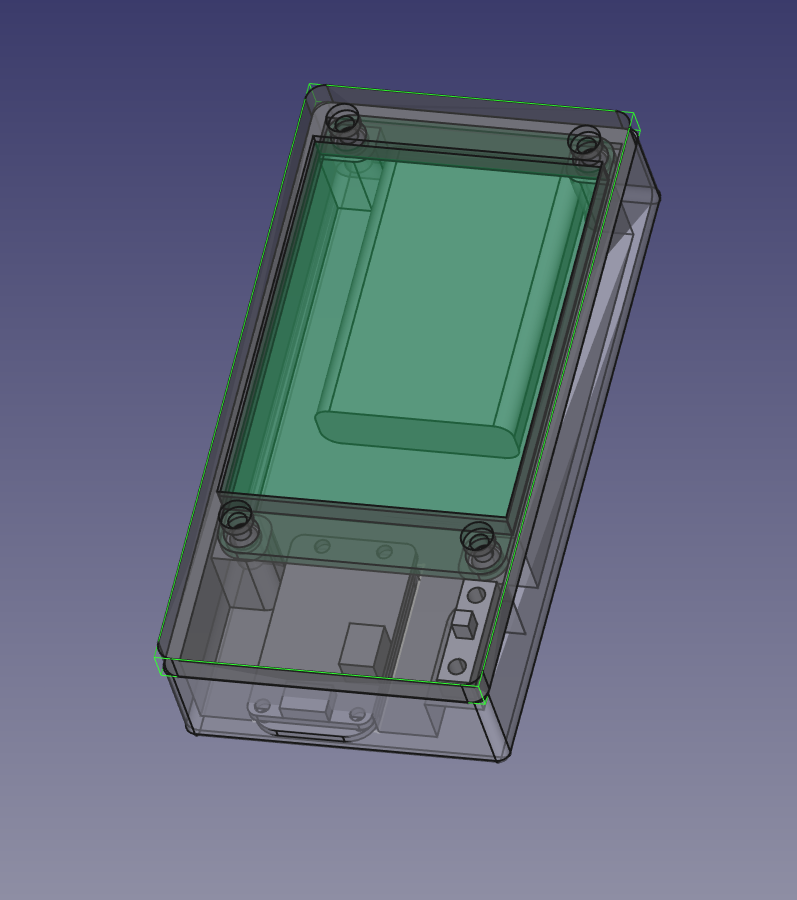 The enclosure with the top |
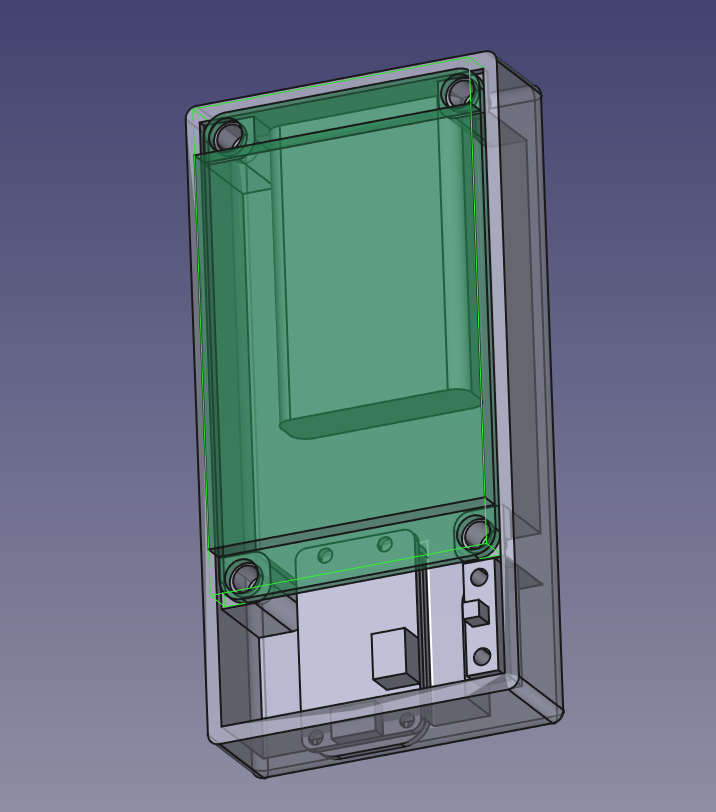 The enclosure no top |
Hale hound ETHICAL TEST with a Faraday Cage
To avoid any risk or problem the most secur way to do some tests is to use a Farday Cage,
(https://en.wikipedia.org/wiki/Faraday_cage),
it's really simple and easy. You can find many video on youtube for a DIY faraday cage.
To make sure the cage is really efficient put the device inside the cage, like a wifi router and try
to connect to this device from outside the cage with your cell phone or other devices, you MUST not be capable to
connect to it, if you can connect to router inside the cage, you must verify your cage because the cage has a 1 or
multiple leak.
What's next :
Additionnal hardware (RFID, NFC, other frequency like 2.4 GHz, SubGHz, Wardriving), probably in the next article.
If you are interested by the 3d printed case or a kit with the case, the board and a pre-installed
firmware (from the github) you can contact Me.